


Elevate Your Flutter App Accessibility without the hassle
Make your app inclusive and user-friendly for all in no time. It's literally THAT easy.


Let's talk about making our apps more inclusive and accessible.
Accessibility might seem daunting at first, but with the right tools, it's totally manageable—and incredibly rewarding.
Today, I'm excited to introduce you to a gem in the Flutter ecosystem: the accessibility_tools package.
Grab your favorite beverage ☕️🍵 and let's dive in!
Why Bother with Accessibility?
Creating an app accessible to all users is not just a nice-to-have; it's essential. It ensures that everyone, including people with disabilities, can use your app effectively. It's about inclusivity, but it's also about reaching a wider audience and improving your app's overall quality.
But where do you start? That's where accessibility_tools comes in.
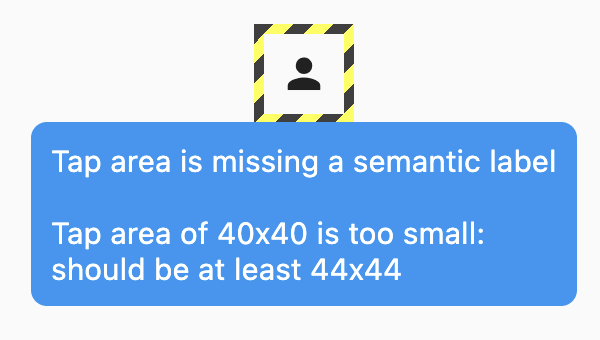
Image from Rebel App Studio
Getting Started with accessibility_tools
First things first, let's add AccessibilityTools to your project. Simply wrap your app's child widget with AccessibilityTools in the MaterialApp builder, like so:
class MyApp extends StatelessWidget {
  @override
  Widget build(BuildContext context) {
    return MaterialApp(
      builder: (context, child) {
        return AccessibilityTools(
            child: child,
        );
      },
      home: HomePage(),
    );
  }
}
The beauty of accessibility_tools is that it only runs in debug mode and won't affect your release builds. So, you can integrate it early in your development process without worrying about performance hits in production.
What Can accessibility_tools Do for Me?
Semantic Label Checker
Imagine tapping a button and not knowing what it does because there's no verbal feedback. That's a no-go for users relying on screen readers. This checker ensures all your tappable widgets, like buttons, have meaningful semantic labels.
Tap Area Checker
Ever tapped on a button and missed because it was too small? This checker ensures all tappable areas meet the minimum size requirements, making your app more user-friendly, especially for those with motor impairments.
Large Font Overflow Checker
This one's a bit experimental but super useful. It checks for layout overflows when users have their font sizes cranked up for better readability. No more cut-off texts!
Input Label Checker
Text fields and input widgets need labels for context. This checker makes sure all your inputs are properly labeled, helping users understand what information is required.
Customize to Your Needs
Accessibility_tools is highly customizable. You can enable or disable checkers based on your app's needs, ensuring you're focusing on the accessibility aspects most relevant to your project.
AccessibilityTools(
  minimumTapAreas: MinimumTapAreas.material,
  checkSemanticLabels: false,
  checkFontOverflows: true,
  child: child,
)
Wrapping Up
Inclusivity shouldn't be an afterthought in app development. With accessibility_tools, you're equipped to integrate accessibility checks right from the start, ensuring your Flutter app is welcoming to all users.
Did this peek your interest? Consider diving deeper into the accessibility_tools package and exploring how it can improve your app's accessibility. Your users will thank you!
And hey, if you found this guide helpful, why not share it with your fellow Flutter devs? Together, we can make the app world a more accessible place.
Wishing you success in your accessibility journey! 🌈